How to Make Turducken

Use these instructions to make your own turducken. If the duck you purchased happens to be smaller than the chicken, you can change the order in which they are assembled. This recipe can be made with different birds, even wild birds, as well. A grouse inside a mallard, inside a wild turkey would be great!
Use your favourite seasonings and stuffing recipe(s) to flavour the turducken. I chose to do this one with a Chinese inspired stuffing, a hoisin-honey glaze, and a 5-spice dry brine, but you can flavour it any way you’d like!
I find the traditional way of making it using three different stuffings gets a little busy and much prefer a harmonious turducken with one type of stuffing throughout. If you’d like to get creative and make three different stuffings though, go for it!
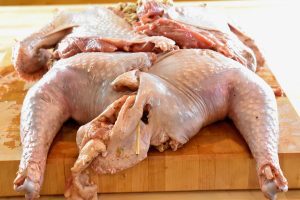
Use this guide to de-bone a chicken: How to Debone a Chicken.
Use this guide to de-bone a duck: How to Debone a Duck.
Use this guide to de-bone a turkey: How to Debone a Turkey.
Ingredients
For the Turducken
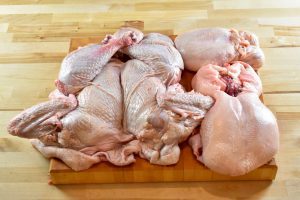
- 1 boneless turkey
- 1 boneless duck
- 1 boneless chicken
- (See links in introduction for how to debone the birds)
- 10-14 cups of stuffing OR 4 cups each of three different types of stuffing (use 1 full loaf of bread to make 12 cups or so of stuffing)
- Your favourite turkey seasoning or glaze
For the Dry Brine
- 6 tablespoons of kosher salt
- 3 tablespoons of your favourite blend of herbs and spices
Special Equipment
- Large roasting tray
- Baking sheet (if you are using a foil roasting tray)
- Several long bamboo or metal skewers
- Reliable meat thermometer
Preparation
To be done 1-3 days before cooking
Mix the dry brine ingredients together.
Dry brine the birds by rubbing the salt mixture over all three birds, front and back, really getting it into the creases.
Transfer the birds to a large vessel or plastic bag and store in the fridge for 1-3 days.
The longer you let them brine, the saltier they will be at the end.
Day of: Assembly
The morning of the day you plan on cooking the turducken is when you’ll want to assemble it.
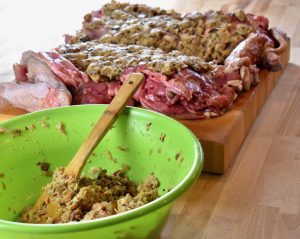
First, make your stuffing(s), then let them cool. To speed up cooling, transfer the stuffing from the pot to a sheet pan to allow for more exposed surface area.
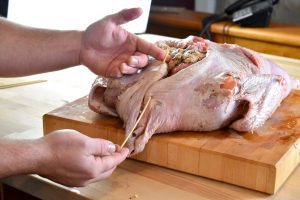
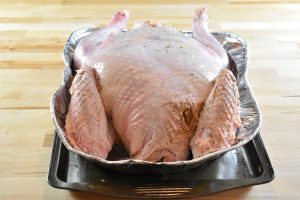
First, lay the brined turkey on a clean surface, skin side down, with its feet facing you.
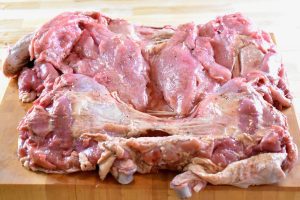
Scoop out a little more than 1/3 of the stuffing (or all of the first stuffing you made if using three) and press it onto the turkey, spreading it around so that it covers most of the surface. Complete coverage isn’t very important here.
Now take your brined duck (or chicken if it was larger) and place it skin-side down on top of the turkey and stuffing.
Scoop out about half of the remaining stuffing (or use the second stuffing you made) and press it onto the duck, spreading it around so it covers most of the surface.
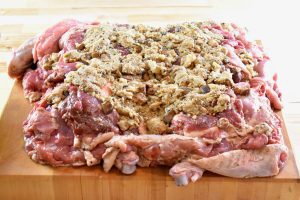
Now take your brined chicken (or duck if it was smaller) and place it skin-side down on top of the duck and stuffing.
Scoop out the last of the stuffing (or the third stuffing you made) and press it onto the chicken focusing the majority of the stuffing down the centre of the chicken.
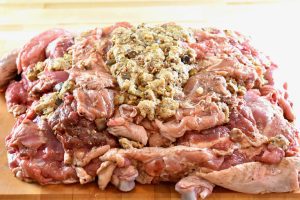
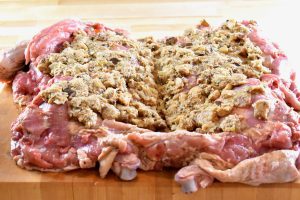
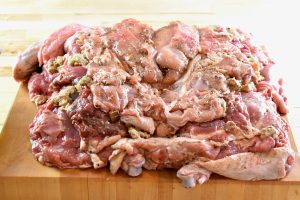
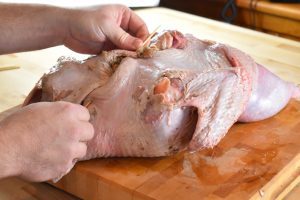
Now that the turducken has been layered and stuffed, it’s time to wrap it up.
Grasp the outer edges of the turkey and pull them out and up, preparing to pull the two sides up to the top middle. Fold the thighs so they’re facing up.
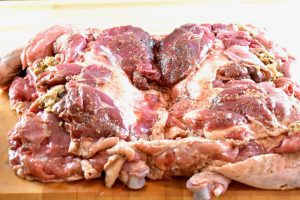
You can use twine and a cook’s sewing needle to sew the bird together, but I find it much easier to reconnect it using bamboo skewers.
Begin by pulling the two thigh pieces together and pushing the skewer through one thigh first, then the other, then the first one again, alternating back and forth as you push the skewer through. This should be done in 2 inch increments or so.
Once you’ve run into the end of your skewer, start with another one where you left off.
This process takes some patience and a little strength to pull everything together. Don’t be afraid to use a lot of skewers if it makes it easier, no one will see them.
Pass a skewer through from the front of the bird to the back as well, to help hold everything together.
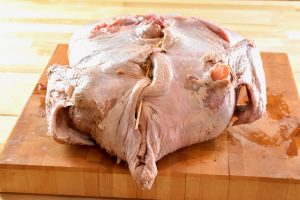
It should look something like this when you’re finished.
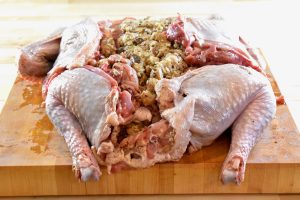
Now for the terrifying part. Get help with this if possible!
Very carefully flip the bird over into its cooking vessel (use a deep roasting dish) so that the breasts are facing upwards. Tuck the wingtips under and into the ‘armpits’ of the bird.
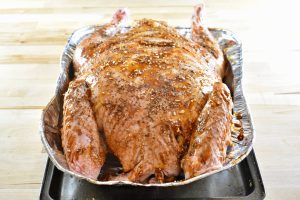
Rub the turducken down with seasoning and any sauce you’re using (use your favourite roasted turkey recipe).
Cooking the Turducken
Preheat the oven to 375°F (190°C, gas mark 5) and adjust the racks so the turducken will fit into the oven.
If you are using a foil pan to roast the turducken, place it onto a sturdy sheet pan. This will allow you to easily lift up the turducken without spilling hot juices everywhere once it’s cooked. Trust me, that sucks.
Once the oven has preheated put the turducken in and cook for 1 hour.
Check on the turducken and make sure the skin/glaze isn’t burning. If it is getting too dark, take two pieces of aluminum foil and connect them by folding two edges together.
Drape the foil over the turducken, making sure to cover the legs and wings especially.
Using a temperature gauge is the only surefire way to tell how cooked your bird is.
Begin checking after 2 hours. You want to stick the gauge into the centre of the turducken, where the chicken and stuffing are.
The turducken is done when the internal temperature reaches 165°F (75°C).
Keep an eye on the turducken. You may need to drain the liquid that collects in the roasting pan if there is more than an inch (2cm) or so of it.
Using a turkey baster to remove the juices is the safest way to do this. Simply suck up the juices and squirt them into a separate pot, which you can save for gravy or stock. If you’re not afraid of horrible burns and potentially dropping the entire turkey, you could pour the liquid in the tray into a pot, but I wouldn’t suggest it.
Once you’ve reached 165°F (cooking time is variable, considering the size of the birds, the amount of stuffing, and the oven it’s cooking in), remove the turducken from the oven and let rest for at least 20 minutes.
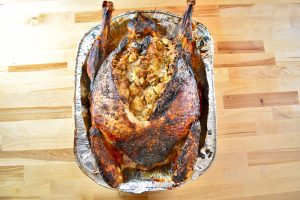
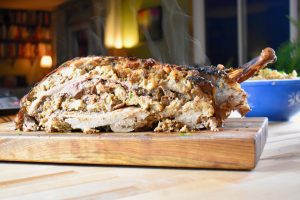
Some splitting of the skin occurred on the turducken in this picture. Unfortunate, but not a big deal.
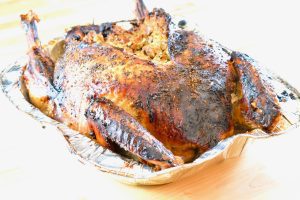
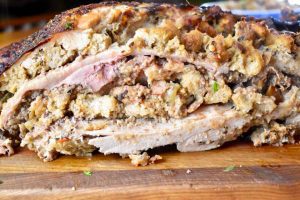
For dramatic presentation, cut the turducken in half from neck to tail. Since there are no bones, the knife should easily cut right through.
Bring to the table like this so everyone can see the different layers in the turducken.
Now remove the wing and leg and set them on a serving tray.
Cut the rest of the meat in medium slices from the wing/leg side to the cut side, or crossways. Serve on a platter.
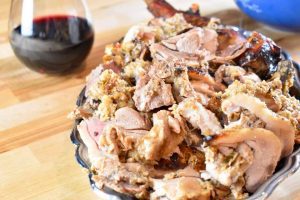
Enjoy! I bet you won’t even need any gravy for this bird!